Saturday, January 31, 2009

User Administration Tool -Part 3

Introduction

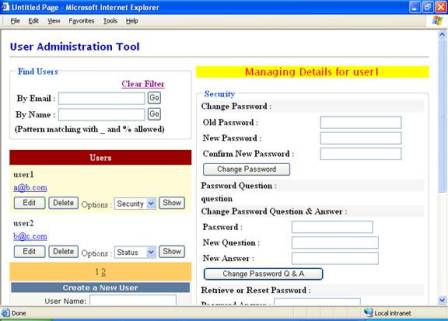
In Part 2 of this series we covered user management features. This final part will deal with role management and profile management.

Managing roles

The case for Role management option is shown in Figure 14.

...
case "Roles":
string[] roles = Roles.GetAllRoles();
FillControlsWithRoles(roles);
string[] userroles = Roles.
GetRolesForUser(user.UserName);
foreach (string s in userroles)
{
ListItem li = CheckBoxList1.Items.FindByValue(s);
if (li != null)
li.Selected = true;
}
MultiView1.ActiveViewIndex = 3;
break;
...

Figure 14: Case for Roles

The code gets a list of all the roles defined in the system by calling GetAllRoles() method of the Roles object. The returned roles are supplied as a parameter to a method called FillControlsWithRoles(). This method is discussed shortly and simply fills the CheckBoxList and DropDownList with the roles. The code then proceeds to retrieve a list of roles belonging to the user. This is done by calling GetRolesForUser() method of the Roles object. The for loop iterates through the array of roles returned by the GetRolesForUser() method and checks those roles in the CheckBoxList. Finally ActiveViewIndex property of the MultiView is set to 3.

The Role Management panel allows the administrator to perform in all three tasks � user to role mapping, role creation and role deletion. Once the administrator assigns or removes roles to a user he needs to click on the Update User Roles button. The Click event handler of the Update User Roles button is shown in Figure 15.

protected void Button10_Click(object sender,
EventArgs e)
{
MembershipUser user = Membership.GetUser
(ViewState["username"].ToString());

foreach (ListItem li in CheckBoxList1.Items)
{
if (li.Selected)
{
if (!Roles.IsUserInRole(user.UserName, li.Value))
{
Roles.AddUserToRole(user.UserName, li.Value);
}
}
else
{
if (Roles.IsUserInRole(user.UserName, li.Value))
{
Roles.RemoveUserFromRole(user.UserName, li.Value);
}
}
}
}

Figure 15: Updating user roles

The code iterates through the list of all roles i.e. CheckBoxList items and adds the user to selected roles. This is done by calling AddUserToRole() method of the Roles object. The AddUserToRole() method accepts two parameters � user name and role name. On the same lines the user is removed from the roles unchecked by the administrator. This is achieved by calling RemoveUserFromRole() method of the Roles object. The RemoveUserFromRole() method also accepts the same two parameters as the AddUserToRole() method.

The administrator can create new roles by entering in the role name in the relevant textbox and clicking on the Create button. Figure 16 shows the Click event handler of the Create button.

protected void Button8_Click
(object sender, EventArgs e)
{
Roles.CreateRole(TextBox10.Text);
FillControlsWithRoles(Roles.GetAllRoles());
}

Figure 16: Creating new roles

The code simply calls the CreateRole() method of the Roles object passing the desired role name. After a new role has been added the CheckBoxList and the DropDownList must show the new role and hence FillControlsWithRoles() method is called.

The administrator can delete a role by selecting it from the relevant DropDownList and clicking on the Delete button. The Click event handler of the Delete button is shown in Figure 17.

protected void Button9_Click
(object sender, EventArgs e)
{
Roles.DeleteRole(DropDownList2.SelectedValue);
FillControlsWithRoles(Roles.GetAllRoles());
}

Figure 17: Deleting a role

The code calls DeleteRole() method of the Roles object passing the role name to be deleted. In order to reflect the change in the CheckBoxList and DropDownList the FillControlsWithRoles() method is called again.

We have been using the FillControlsWithRoles() method at many places. The code for this helper method is shown in Figure 18.

private void FillControlsWithRoles
(string[] roles)
{
CheckBoxList1.Items.Clear();
DropDownList2.Items.Clear();
foreach (string s in roles)
{
CheckBoxList1.Items.Add(s);
DropDownList2.Items.Add(s);
}
}

Figure 18: Filling controls with roles

The method simply clears the CheckBoxList and DropDownList control and refills them with the roles array passed as a parameter.

This complete the user role management. Now we will move on to coding the last feature i.e. Profile management.

Viewing user profiles

The case of the Profile Management option looks as shown in Figure 19.

...
case "Profile":
ProfileCommon pc = Profile.
GetProfile(user.UserName);
DropDownList3.Items.Clear();
foreach (SettingsProperty p in
ProfileCommon.Properties)
{
DropDownList3.Items.Add(p.Name);
}
MultiView1.ActiveViewIndex = 4;
break;
...

Figure 19: Case for profile management

The code retrieves profile of the user by calling GetProfile() method. The GetProfile() method accepts the user name whose profile is to be retrieved. The profile is returned as an instance of ProfileCommon class. The code then iterates through all the profile properties using Properties collection of the ProfileCommon class. Each element of the Properties collection is of type SettingsProperty. The name of each profile property is added to the relevant DropDownList. Note that the profile properties from a property group are shown using dot (.) notion. Finally ActiveViewIndex property of the MultiView is set to 4.

The administrator can modify any of the profile properties or he can delete the entire profile of the user. When the administrator selects a particular profile property from the DropDownList, its value is shown a textbox. This is done in the SelectedIndexChanged event of the DropDownList (Figure 20).

protected void DropDownList3_
SelectedIndexChanged(object sender, EventArgs e)
{
MembershipUser user = Membership.GetUser
(ViewState["username"].ToString());
ProfileCommon pc = Profile.GetProfile
(user.UserName);
object obj = pc.GetPropertyValue
(DropDownList3.SelectedValue);
TextBox11.Text = obj.ToString();
}

Figure 20: Showing value of a profile property

The code retrieves profile of the user. The value of selected profile property is retrieved using GetPropertyValue() method of the ProfileCommon instance. The returned value is displayed in a textbox so that the administrator can edit it if required. If the administrator changes value of any profile property he needs to click on the Save button. The Save button sets the profile property to a new value and saves it in the underlying profile data store. This is shown in Figure 21.

protected void Button11_Click
(object sender, EventArgs e)
{
MembershipUser user = Membership.GetUser
(ViewState["username"].ToString());
ProfileCommon pc = Profile.GetProfile
(user.UserName);
object obj = pc.GetPropertyValue
(DropDownList3.SelectedValue);
pc.SetPropertyValue(DropDownList3.SelectedValue,
Convert.ChangeType(TextBox11.Text, obj.GetType()));
pc.Save();
}

Figure 21: Modifying a profile property

The code first retrieves the value of the profile property by calling GetPropertyValue() method of the ProfileCommon instance. Wondering why we do that? This is necessary because while setting the new value we need to typecast the string from the textbox to appropriate data type. The call to SetPropertyValue() method will make this clear. The SetPropertyValue() method accepts property name and the new value as parameters. The property value parameter is of type object. While passing the new value we need to convert into the appropriate data type otherwise an exception will be thrown. That�s why the code uses ChangeType() method of the Convert class. The ChangeType() method accepts two parameters � value and the destination data type. Note that we pass the data type of the value previously retrieved here. Finally Save() method of the ProfileCommon instance is called to persist the changes in the underlying data store.

In order to delete the complete profile of a user the administrator can click on the Delete Profile for this user LinkButton. The code that deletes the profile is shown in Figure 22.

protected void LinkButton2_Click
(object sender, EventArgs e)
{
MembershipUser user = Membership.GetUser
(ViewState["username"].ToString());
bool result = ProfileManager.
DeleteProfile(user.UserName);
}

Figure 22: Deleting user profile

The code calls DeleteProfile() method of ProfileManager class by passing the user name to it. The ProfileManager class is used to perform various profile related tasks such as deleting profiles and searching profiles.

That�s it! Our own User Administration Tool is ready to use. Simply drag and drop the Members.ascx on the default web form and run.


Note : this article is collected from the website all right reserved BinaryIntellect Consulting.

User Administration Tool -Part 1

ASP.NET membership, role and profile features make it easy to develop a membership driven web site. However, equally important is a way to administer and manage the users registered with the web site. If you have managed any membership driven web site then you would be familiar with the complaints about forgotten passwords, forgotten user ids and change in email addresses.

Visual Studio provide an inbuilt tool called Web Site Administration Tool that allows you to administer various aspects including membership, roles and application configuration. However, many times it is needed that the user management facility be provided as a part of the web site itself. This way the web site administrator can manage the users from anywhere. The Web Site Administration Tool suffers from some limitations in such cases. Those limitations are:

  • We can not make that tool as a part of your web site
  • The look and feel of the tool may not fit in the theme of our web site
  • We can not view and manage all the information about the users. E.g. user status and activity
  • We can not view profile information of the users
  • We can not do tasks such as password retrieval and reset
  • The tool allows us to modify settings other than membership and roles which might be undesirable

The User Administration Tool

Because of these limitations often we need to roll out our own administrative pages that handle user administration. In this article we will develop a user control that will allow us to administer all the aspect of users and their membership. Specifically the user control will allow us to:

  • Create new users
  • Search for one or more users
  • Modify user information such as email and comments
  • See status of a user
  • View activity of a user
  • Manage password of a user
  • Manage role information
  • View and modify profile information of a user

We will create it as a user control so that it can be added easily to any of the existing web forms. For the rest of the discussion we will call our user control as “User Administration Tool”.

Before we begin any development let’s see how the User Administration Tool is going to look like.

Figure 1 shows the User Administration Tool.

Figure 1 : The User Administration Tool

The tool consists four major sections. On the top it provides searching facility. Search can be based on email or user name. Wild cards (_ and %) are allowed.

Below the search area a GridView displays list of all the users or users filtered depending on the search criteria. The user can be deleted using the Delete button. There is a DropDownList that allows you select which options to display and upon clicking on the Show button the information is displayed on the right hand side. You can also change the email address and comments of a user.

Below the GridView there is facility to create new users.

The right hand side area i.e. the area below “Managing Details for…” label displays various settings related to user status, activity, security, roles and profile.

Creating a web site and a database

In order to begin, create a new web site in VS.NET 2005. Add a new Web User Control called Members.ascx. Open SQL Server Management Studio and create a new database called UserAdminToolTestDb. Note that we could have used an existing database such as Northwind but for the sake of completeness we are create a brand new database. Figure 2 shows the New Database dialog of SQL Server Management Studio.

Figure 2: New Database dialog of SQL Server Management Studio

Configuring membership, role and profile providers

Now that we have created the database it’s time to configure it to support membership, roles and profile features. These features are collectively called as application services. ASP.NET provides a command line tool called aspnet_regsql.exe that can be used for enabling and disabling the application services. The aspnet_regsql.exe tool can be used in command line mode or wizard mode for this purpose. We will use the later mode for configuring the database.

Open Visual Studio.NET 2005 Command Prompt from the Visual Studio 2005 program group. Type aspnet_regsql.exe and hit enter. The aspnet_regsql tool should start itself in wizard mode. The wizard consists of five steps. Figure 3 shows the first step of the wizard.

Figure 3: Step 1 of aspnet_regsql.exe tool

The second step (Figure 4) asks you whether you want to enable or disable application services. Select “Configure SQL Server for application services” radio button and click on Next.

Figure 4: Step 2 of aspnet_regsql.exe tool

The third step (Figure 5) accepts database details such as server name, authentication method and database name. After entering the required details click Next.

Figure 5: Step 5 of aspnet_regsql.exe tool

The fourth step (Figure 6) simply shows the summary of the settings. Clicking Next actually starts the configuration process.

Figure 6: Step 4 of aspnet_regsql.exe tool

The final step (Figure 7) is just a confirmation that the tool has configured the database correctly.

Figure 7: Step 5 of aspnet_regsql.exe tool

The aspnet_regsql.exe tool creates several tables and stored procedures (prefixed with aspnet_) in the underlying database. These tables and stored procedures are used by the membership, roles and profile features.

Configuring the membership, role and profile providers for web site

Configuring your database for supporting membership, role and profile features is just half part of the story. We also need to configure the web site so that Membership, Roles and Profile objects (as well as login controls if they are being used in the web site) correctly point to the required data store. This is achieved by adding some markup in the web.config file.

Open the web.config file and add a section as shown in Figure 8.


Figure 8: Storing database connection string

The stores zero or more database connection strings. In our case we have added a connection string named connstr pointing to UserAdminToolTestDb database we created earlier. The connection string shown in Figure 8 uses integrated security. One needs to modify it depending on the SQL Server setup.

Now add the markup as shown in Figure 9 to configure membership and role provider.


Figure 9: Configuring membership and role provider

The tag configures the membership provider where as the tag enables and configures the role provider. Both these sections point to our database connection string connstr. Note how password reset, retrieval features are enabled using enablePasswordReset and enablePasswordRetrieval attributes. Also note how the password storage format is specified using the passwordFormat attribute. The passwordFormat attribute takes three possible values – Clear, Encrypted and Hashed. Since we are using SQL Server database the type attribute of membership configuration is set to System.Web.Security.SqlMembershipProvider. The SqlMembershipProvider class handles all the intricacies of membership management with the underlying database. On the same lines type attribute of role manager configuration points to System.Web.Security.SqlRoleProvider.

Finally, add the markup for configuring profile provider and profile properties. The markup looks as shown in Figure 10.


Figure 10: configuring profile provider

The section does two jobs. First it configures the profile provider and second it configures the profile properties and groups. The profile provider configuration points to our connection string. This time the type that handles ins and outs of profile management is System.Web.Profile.SqlProfileProvider. Various profile properties and a profile group is defined with and tags respectively. We have deliberately added a DateTime property called DOB so that we can test the implication of using data types other than string. We have also added a property group so that we can test how these groups can be accessed. (These points will become clear when we code related functionality later on)

Designing the GridView for displaying list of users

Now that we have set up the database let’s display a list of users in a GridView. In order to do so open the Members.ascx user control that we added to the web site earlier. Add a base table with three rows and two columns on to the user control designer. Drag and drop a GridView control as shown in Figure 1. A collection of MembershipUser objects will be acting as the data source for the GridView. Set AllowPaging property of the GridView to true. From the smart tag of the GridView click on “Edit Columns…” link to open the Fields dialog. Figure 11 shows the Fields dialog of the GridView.

Figure 11: Fields dialog of GridView

Add a TemplateField and set its HeaderText property to “Users”. Ensure that “Auto-generate fields” checkbox is unchecked and close the dialog. Design the ItemTemplate and EditItemTemplate as shown in the Figure 12.

Figure 12: ItemTemplate and EditItemTemplate of GridView

The ItemTemplate consists of a Label control for displaying the user name, HyperLink control for displaying email address and another Label control for displaying comments about the user. The template also has Button controls titled Edit and Delete. Finally, there is a DropDownList that contains possible user options (Status, Security etc.) and a Button titled Show.

Once you design the ItemTemplate open the smart tag for user name Label and select “Edit DataBindings…” option to open DataBindings dialog as shown in Figure 13.

Figure 13: DataBindings dialog

Select Text property from the “Bindable Properties” list. In the “Code expression” textbox enter Eval(“UserName”). This will bind the Text property of the Label with the UserName property of the underlying data element. Similarly bind the Text and NavigateUrl properties of the HyperLink with Email property of the underlying data element. Also bind Text property of comment label to Comment property of the underlying data element. From the smart tag of DropDownList select “Edit Items…” option to open the ListItem Collection Editor as shown in Figure 14.

Figure 14: ListItem Collection Editor

Add five items namely – Status, Activity, Security, Roles and Profile. Finally set the CommandName property of Edit and Delete buttons to “Edit” and “Delete” respectively. This completes the design of ItemTemplate.

The EditItemTemplate consists of a Label control for displaying user name and two textboxes for editing email and comments respectively. The newly entered data is saved using the Save button and the edit operation can be cancelled using the Cancel button. Data bind the Label and Textboxes with UserName, Email and Comment properties exactly as before. Also set the CommandName property of the Save and Cancel buttons to “Update” and “Cancel” respectively. This completes the design of EditItemTemplate.

Designing user interface for searching users

In order to design a user interface for searching users, drag and drop a Panel control above the GridView that we just designed. Set the GroupingText property of the panel to “Find Users”. Add a table with four rows and two columns and place controls as shown in Figure 15.

Figure 15: Find Users panel

The Find Users panel consists of two Textboxes for accepting search criterions for email search and user name search respectively. Search criteria can contain wild cards _ (single character) and % (any number of characters). Clicking on the respective Go button will display only the matching records in the GridView. At the top there is a LinkButton for clearing the filter criteria so that the GridView displays the complete list of users.

Designing user interface for creating new users

Designing user interface for creating new users is fairly simple. Simply drag and drop a CreateUserWizard control below the GridView that we designed previously. Apply some formatting theme to it if required. That’s it.

Designing user interface for displaying user details

The user interface for displaying user details consists of MultiView and View controls. In order to design the interface, drag and drop a MultiView control on the right hand side of the GridView and Find Users panel (refer Figure 1). Drag and drop five View controls inside the MultiView control. Further drag and drop a Panel control in each of the View control and set their GroupingText property to User Status, User Activity, Security, Role Management and Profile Management respectively.

Design the first View control as shown in Figure 16.

Figure 16: View control for displaying User Status

The View for User Status consists of three Checkbox controls and a Button control. The checkboxes indicate if the user is active, locked out or online. The administrator can mark a user as inactive by un-checking the Is Active checkbox. The “Is Locked Out” checkbox is enabled only if the user is locked i.e. user can only be unlocked by the administrator. The “Is Online” checkbox is always disabled. It simply displays the on-line status of the user. The changes can be saved by clicking the Save Changes button.

Now design the second View control as shown in Figure 17.

Figure 17: View control for displaying User Activity

The second View control shows the activity of the user in terms of creation date, last activity date, last lockout date, last login date and last password change date. All the information displayed here is read only.

Design the third View control as shown in Figure 18 and 19.

Figure 18: View control for managing security details

Figure 19: View control for managing security details

The third View control allows the administrator to change the password of a user or the password question and answer. It also allows the administrator to retrieve or reset the password. The Get Password button is enabled only if the password retrieval feature is enabled on the membership provider. Similarly the Reset Password button is enabled only if the password reset feature is enabled on the membership provider. Note that for the sake of simplicity we have not taken any care of validating the inputs.

It’s time to design the fourth View control. This View control allows the administrator to manage roles in the system as well as user to role mapping. Design the View control as shown in Figure 20.

Figure 20: View control for managing roles

The “Add/Remove user from role(s)” section displays a list of all the roles with the roles to which the user belongs to as checked. The administrator can add or remove the user from one or more role(s) and click on Update User Roles button to save the changes. The administrator can also create a new role or delete existing roles. Note that for the sake of simplicity we have not taken any care of validating the inputs.

Finally design the fifth View control as shown in Figure 21

Figure 21: View control for managing profile

The fifth View control allows the administrator to manage profile of a user. A DropDownList shows a list of all the profile properties. The property values can be read or changed. Clicking on the Save button saves the changes. The administrator can also delete the profile of the user. Note that profile properties can be of a user defined type (customer class for example). Such properties of course can not be read or modified via this tool.

That’s it! We have just completed designing the user interface of the User Administration Tool. The mark up of Members.ascx is bit lengthy and hence not given here. You can get it in the download accompanying this article.

Conclusion

Membership, Role and Profile features come handy while building a secure membership driven web site. Often the administrators need a tool that allows them to manage users easily. In the Part 1 of this series we kicked off developing such a flexible yet simple tool. We developed user interface of a web user control for managing various aspect of user administration such as password recovery, role mapping and profile management. In the Part 2 of this article we will code the functionality to make our user control functional

Note : this article is collected from the website all right reserved BinaryIntellect Consulting.

User Administration Tool -Part 2

In the Part 1 of this series we started developing a web user control that allows us to manage various aspects of user administration such as password recovery, role mapping and profile management. We configured the database and web site for availing membership, role and profile features of ASP.NET. Continuing our development further we will now code various pieces of the functionality.

Binding the GridView with list of users

ASP.NET provides an inbuilt member called Membership through which membership information can be retrieved. In order to retrieve a list of users and bind them with the GridView we write a method called BindGrid(). There are two overloads of this method. One accepting the search criteria and search by option and the other without any parameters. Figure 1 shows these two overloads.

private void BindGrid(string criteria,FindByOptions option)
{
MembershipUserCollection m =null;
if (option == FindByOptions.Email)
{
ViewState["emailcriteria"] = criteria;
m = Membership.FindUsersByEmail(criteria);
}
else
{
ViewState["usernamecriteria"] = criteria;
m = Membership.FindUsersByName(criteria);
}
GridView1.DataSource = m;
GridView1.DataBind();
}
private void BindGrid()
{
if (ViewState["emailcriteria"] != null)
{
BindGrid(ViewState["emailcriteria"].ToString(),
FindByOptions.Email);
return;
}
if (ViewState["usernamecriteria"] != null)
{
BindGrid(ViewState["usernamecriteria"].ToString(),
FindByOptions.UserName);
return;
}
MembershipUserCollection m = Membership.GetAllUsers();
GridView1.DataSource = m;
GridView1.DataBind();
}

Figure 1: Binding GridView with a list of users

The first overload takes two parameters. The search criteria is a string containing the search pattern. The second parameter is of type FindByOptions. FindByOptions is an enumeration defined by us and looks like this:

public enum FindByOptions
{
Email,UserName
}

Through the enumeration we specify whether we want to find users on the basis of their email address or user name. Depending on this parameter we call FindUsersByEmail() or FindUsersByName() method of Membership object. The return value of FindUsersByEmail and FindUsersByName methods is a collection of type MembershipUserCollection. Each member of this collection is of type MembershipUser and represents a user. The MembershipUserCollection acts as a data source for the GridView. Note that the code creates two ViewState variables - emailcriteria and usernamecriteria - to store the corresponding search criterions. This way we can filter the users across post backs. This overload of the BindGrid() method is called when the administrator clicks on any of the Go buttons of the Find Users panel.

In the second overload of the BindGrid() method the code checks for existence of the same two ViewState variables. Their presence indicates that some search filter is active. If any search filter is active then the previous overload of the BindGrid() is called. Otherwise the code calls the GetAllUsers() method of Membership object. The GetAllUsers() method returns all the users of the web site in the form MembershipUserCollection. The collection is then bound with the GridView as before. This overload of BindGrid() is called from the Load event of the user control and also from various other places.

Figure 2 shows the Page_Load event handler of the user control.

protected void Page_Load(object sender,
EventArgs e)
{
CreateUserWizard1.ContinueDestinationPageUrl =
Request.Path;
if (!IsPostBack)
BindGrid();
}

Figure 2: Page_Load event handler of user control

The code sets the ContinueDestinationPageUrl property of the CreateUserWizard control to the URL of the current web form. This way the administrator is redirected to the same web form after clicking the Continue button of the CreateUserWizard control. The code also calls the BindGrid() method to bind the GridView with the list of users.

Handling Paging and Data Binding of the GridView

There might be many users registered with the web site and hence the GridView must implement paging functionality. Since we are not using any Data Source controls we need to implement paging functionality ourselves. In order to do so we must handle two events related to paging � PageIndexChanging and PageIndexChanged. The former is raised when a new page number is selected but before navigating to the new page. The later is raised when the page index has been changed. Figure 3 shows the event handlers for these two events.

protected void GridView1_PageIndexChanging
(object sender, GridViewPageEventArgs e)
{
GridView1.PageIndex = e.NewPageIndex;
BindGrid();
}

protected void GridView1_PageIndexChanged
(object sender, EventArgs e)
{
Label21.Text = "";
MultiView1.ActiveViewIndex = -1;}

Figure 3: Handling paging of the GridView

The PageIndexChanging event handler receives an event argument of type GridViewPageEventArgs. The GridViewPageEventArgs class contains a property called NewPageIndex that specifies the new page index. The code sets the PageIndex property of the GridView to the value indicated in the NewPageIndex property and calls the BindGrid() method.

In the PageIndexChanged event we clear off the MultiView by setting its ActiveViewIndex property to -1. This way no View control will be visible and we will be saved from the mismatch between currently displayed users and user details already shown. For the same reason we also set the title label to empty string.

When the administrator clicks on the Show button from a row we need to display the details about that user. That means the Click event handler of the Show button needs to know the UserName of the user that is shown by that row. In order to satisfy this requirement we handle RowDataBound event of the GridView. The RowDataBound event is raised for each and every row (including header and footer row) when the row is data bound. Figure 4 shows the RowDataBound event handler of the GridView.

protected void GridView1_RowDataBound
(object sender, GridViewRowEventArgs e)
{
if (e.Row.RowType == DataControlRowType.DataRow &&
e.Row.RowState == DataControlRowState.Normal)
{
Button b1 = (Button)e.Row.FindControl("Button1");
Label l = (Label)e.Row.FindControl("Label1");
b1.CommandName = e.Row.RowIndex.ToString();
b1.CommandArgument = l.Text;
}
}

Figure 4: Handling RowDataBound event of the GridView.

We need to execute our code only for the rows that contain data i.e. excluding header and footer rows and those that are in read only mode. This is done with the help of RowType and RowState properties as shown. The code then retrieves a reference to the Show button and user name label by calling FindControl() method. Then the CommandName property of the button is set to the current row index. Similarly the CommandArgument is set to the user name as displayed in the label. This way the Show button�s Click event handler will know which row has been clicked and what the corresponding user name is.

Editing and deleting users

Recollect that we have Edit, Delete, Update and Cancel buttons in the ItemTemplate and EditItemTemplate of the GridView template column. We have set the CommandName property of these buttons to Edit, Delete, Update and Cancel respectively. Due to this these buttons will raise RowEditing, RowDeleting, RowUpdating and RowCancelingEdit events when clicked. We will handle these events in order to add editing capabilities to our GridView. Figure 5 shows the event handlers for these events.

protected void GridView1_RowEditing
(object sender, GridViewEditEventArgs e)
{
GridView1.EditIndex = e.NewEditIndex;
BindGrid();
}

protected void GridView1_RowUpdating
(object sender, GridViewUpdateEventArgs e)
{
Label l=(Label) GridView1.Rows[e.RowIndex].
FindControl("Label1");
TextBox t1 = (TextBox)GridView1.Rows[e.RowIndex].
FindControl("TextBox12");
TextBox t2 = (TextBox)GridView1.Rows[e.RowIndex].
FindControl("TextBox13");
MembershipUser user = Membership.GetUser(l.Text);
user.Email = t1.Text;
user.Comment = t2.Text;
Membership.UpdateUser(user);
GridView1.EditIndex = -1;
BindGrid();
}

protected void GridView1_RowCancelingEdit
(object sender, GridViewCancelEditEventArgs e)
{
GridView1.EditIndex = -1;
BindGrid();
}

protected void GridView1_RowDeleting
(object sender, GridViewDeleteEventArgs e)
{
Label l = (Label)GridView1.Rows[e.RowIndex].
FindControl("Label1");
Membership.DeleteUser(l.Text);
BindGrid();
}

Figure 5: Editing and deleting related event handlers

The RowEditing event handler receives a parameter of type GridViewEditEventArgs. The GridViewEditEventArgs class contains a property called NewEditIndex that indicates the row index of the row whose Edit button has been clicked. The code sets EditIndex property of the GridView to the value of the NewEditIndex property. Setting the EditIndex property will cause the GridView to enter in edit mode and EditItemTemplate will be displayed. The code then calls the BindGrid() method to bind the GridView again.

The RowUpdating event is the important event wherein the actual operation of updating the user is done. The RowUpdating event receives a parameter of type GridViewUpdateEventArgs. The GridViewUpdateEventArgs class provides the row index of the row being updated via RowIndex property. The code retrieves a reference to the row being updated from the Rows collection of the GridView. The code further obtains references to the user name label and email and comment textboxes using FindControl() method. The MembershipUser object corresponding to the specified user is obtained using the GetUser() method of the Membership object. The code then updates the Email and Comment properties of the MembershipUser instance and updates the user information back using UpdateUser() method of the Membership object. Finally, EditIndex property of the GridView is set to -1 to take the GridView back into read only mode.

The RowCancelingEdit event handler simply sets the EditIndex property of the GridView to -1 and binds the GridView again. This will take the GridView into read only mode.

The RowDeleting event handler receives a parameter of type GridViewDeleteEventArgs. The GridViewDeleteEventArgs class supplies the RowIndex of the row whose Delete button has been clicked. This RowIndex is used to retrieve the row being deleted from Rows collection of the GridView. Once the UserName is obtained from the user name label the code calls DeleteUser() method of the Membership object and rebinds the GridView.

Showing the user information

Each row of the GridView displays a Show button in addition to Edit and Delete buttons. The administrator can select the category of information to view and click on the Show button. Figure 6 shows the outline of code that goes in the Click event handler of the Show button.

protected void Button1_Click1
(object sender, EventArgs e)
{
Button b = (Button)sender;
MembershipUser user = Membership.
GetUser(b.CommandArgument.ToString());
ViewState["username"] = user.UserName;
Label21.Text = "Managing Details for " + user.UserName;
DropDownList ddl = (DropDownList)GridView1.
Rows[int.Parse(b.CommandName)].FindControl("DropDownList1");
switch (ddl.SelectedValue)
{
case "Status":

case "Activity":

case "Security":

case "Roles":

case "Profile":

}
}

Figure 6: Click event handler of Show button

The code first typecasts the sender parameter into a Button. This way we get reference to the Show button that is being clicked. Recollect that we have set the CommandArgument property of the Show button to the UserName. The code retrieves a MembershipUser instance by calling GetUser() method of the Membership object passing this CommandArgument as a parameter. The MembershipUser instance is used by the remaining code to extract required information about the user. The title label shows the UserName of the user whose details are being shown. The UserName is persisted in a ViewState variabled called username for later reference. Finally there is a switch statement that tests the selection in the DropDownList control. Each case of the switch statement populates and displays the corresponding View control from the MultiView control. The code of each case is discussed next.

Showing user status

The User Status panel shows whether the user is active, locked our and on line. The case for user status contains the code as shown in Figure 7.

...
case "Status":
CheckBox1.Checked = user.IsApproved;
CheckBox2.Checked = user.IsLockedOut;
CheckBox3.Checked = user.IsOnline;
if (user.IsLockedOut)
{
CheckBox2.Enabled = true;
}
else
{
CheckBox2.Enabled = false;
}
MultiView1.ActiveViewIndex = 0;
break;
...

Figure 7: Case for User Status

The code simply sets the checkbox values depending on the three Boolean properties of MembershipUser instance � IsApproved, IsLockedOut and IsOnline. The user might have registered with the web site but his account may not be activated. This is indicated by the IsApproved property. By default when the user performs five unsuccessful login attempts his account gets marked as locked. This is indicated by IsLockedOut property. The administrator can unlock a user only if his account is locked. Hence the lock out checkbox is enabled only if the account is locked out. Similarly the IsOnLine property indicates whether the user is currently logged in to the web site. The administrator can not change the on line status of the user and hence the related checkbox is always disabled. After assigning the Checked property the ActiveViewIndex property of the MultiView is set to 0. This causes the MultiView to show the User Status panel in the browser.

Showing user activity

The case for User Activity looks like Figure 8.

...
case "Activity":
Label11.Text = user.CreationDate.ToString();
Label12.Text = user.LastActivityDate.ToString();
Label13.Text = user.LastLockoutDate.ToString();
Label14.Text = user.LastLoginDate.ToString();
Label15.Text = user.LastPasswordChangedDate.ToString();
MultiView1.ActiveViewIndex = 1;
break;
...

Figure 8: Case for User Activity

The code in Figure 8 is fairly simple. It simply retrieves various activity related properties and sets the labels accordingly. All the activity related properties return DateTime instance. The CreationDate property returns the date and time at which the user registered with the web site. The LastActivityDate property indicates the date and time when the user was last authenticated. The LastLockoutDate property returns the date and time when the user account was last locked out. A user account can get locked out when the user tries to signing in unsuccessfully for the number of attempts as indicated by MaxInvalidPasswordAttempts property of the underlying provider. The LastLoginDate property returns the date and time at which the user last logged in to the web site. Finally LastPasswordChangedDate property returns the date and time when the user last changed the password. The ActiveViewIndex property of the MultiView control is set to 1 this time.

Managing security details

The case for Security is shown in Figure 9.

...
case "Security":
Label22.Text = user.PasswordQuestion;
if (!Membership.Provider.EnablePasswordReset)
{
Button5.Enabled = false;
}
if (!Membership.Provider.EnablePasswordRetrieval)
{
Button4.Enabled = false;
}
if (Membership.Provider.PasswordFormat ==
MembershipPasswordFormat.Hashed)
{
Button4.Enabled = false;
Button5.Enabled = false;
}
MultiView1.ActiveViewIndex = 2;
break;
...

Figure 9: Case for Security

The code displays the password question as entered by the user at the time of registration. Then the code checks if the password reset feature is enabled by the membership provider. This is done by checking the EnablePasswordReset property. Depending on the outcome of the check the Reset Password button is enabled or disabled. On the same lines the code checks if the password retrieval feature is enabled by the membership provider. This is done by checking the EnablePasswordRetrieval property. Additionally the code checks if the password storage format is Hashed. Hashed passwords can not be retrieved even if EnablePasswordRetrieval property returns true. Accordingly the Get Password button is enabled or disabled. Finally ActiveViewIndex property of the MultiView control is set to 2 so that the Security View is shown.

The Security panel allows the administrator to perform in all four operations � changing the password, changing the security question and answer, retrieve password and reset password. The Click event handler for Change Password button is shown in Figure 10.

protected void Button6_Click
(object sender, EventArgs e)
{
MembershipUser user = Membership.
GetUser(ViewState["username"].ToString());
bool result = user.ChangePassword(
TextBox3.Text, TextBox4.Text);
}

Figure 10: Changing the password

The code retrieves the MembershipUser instance by calling GetUser() method of the Membership object. Recollect that the Click event of the Show button stores the user name in a ViewState variable called username. The same ViewState variable is used here and passed to the GetUser() method. Finally ChangePassword() method of the MembershipUser instance is called. The ChangePassword() method accepts the old and new passwords and returns the true or false depending on success or failure to change the password.

Figure 11 shows the Click event handler of the Change Password Q & A button.

protected void Button7_Click
(object sender, EventArgs e)
{
MembershipUser user = Membership.GetUser(
ViewState["username"].ToString());
bool result = user.ChangePasswordQuestionAndAnswer(
TextBox6.Text, TextBox7.Text, TextBox8.Text);
}

Figure 11: Changing the password question and answer.

The code retrieves the MembershipUser instance by calling GetUser() method of the Membership object. Then ChangePasswordQuestionAndAnswer() method of the MembershipUser instance is called. The ChangePasswordQuestionAndAnswer() method accepts three parameters � password, new question and new answer. The method returns true or false indicating the successor failure of the operation.

The Click event handler of the Get Password button is shown in Figure 12.

protected void Button4_Click
(object sender, EventArgs e)
{
MembershipUser user = Membership.GetUser(
ViewState["username"].ToString());
string str = user.GetPassword(TextBox9.Text);
Label30.Text = "Password :" + str;
}

Figure 12: Retrieving the password

The code retrieves the MembershipUser instance by calling GetUser() method of the Membership object. In order to retrieve password of the user GetPassword() method is called. The GetPassword() method accepts password answer as a parameter and returns the password. The password is then displayed in a label.

Finally the Click event handler of Reset Password button is shown in Figure 13.

protected void Button5_Click
(object sender, EventArgs e)
{
MembershipUser user = Membership.GetUser(
ViewState["username"].ToString());
string str = user.ResetPassword(TextBox9.Text);
Label30.Text = "Password has been reset to :" + str;
}

Figure 13: Resetting the password

The code retrieves the MembershipUser instance by calling GetUser() method of the Membership object as before. Then ResetPassword() method of the MembershipUser instance is called. The method accepts the password answer as a parameter and returns the new password as a return value. The new password is then displayed in a label.

Summary

In this part we covered display of user information and password management. The next part will deal with role management and managing profile of the user.

Note : this article is collected from the website all right reserved BinaryIntellect Consulting.

Membership, Roles and Profile -Part 2

Introduction

In Part 1 we learnt about customizing the CreateUserWizard control, adding the newly registered user to a default role and storing data in Profile properties. Going further this article will explain how to develop an administrative page that manages User-Role mapping. We will also discuss Login controls such as Login and LoginView.

Managing User-Role mapping

Once a user registers with the web site, the administrator needs to manage his roles. The administrator can certainly use the "Web Site Administration Tool" for this purpose. However, in many real world applications this facility is provided within the application itself. This makes sense because the person handling the user-role mapping may not always have access to VS.NET 2005.

We will now develop a web form that allows an administrator to manage user-role mapping. The web form looks as shown in Figure 1.

Figure 1

At the top there is a ListBox that displays list of all the registered users of the web site. Just below the ListBox there is a CheckBoxList that displays list of the roles in the systen. Once you select a user his current roles are displayed in the CheckBoxList. The administrator can add/remove user from one or more roles. Once the desired roles are assigned the administrator needs to click on the "Assign Roles" button to save the changes.

Developing the web form

Begin by adding a new web form called RoleManager.aspx in the web site. Design the web form as shown in Figure 1. Make sure to set the AutoPostBack property of ListBox to true.

In the Page_Load event we will populate the ListBox with list of all the users and the CheckBoxList with list of roles. Write the following code in the Page_Load event handler.

protected void Page_Load(object sender, EventArgs e)
{
if (!IsPostBack)
{
MembershipUserCollection users = Membership.GetAllUsers();
foreach (MembershipUser user in users)
{
ListBox1.Items.Add(user.UserName);
}

string[] allRoles = Roles.GetAllRoles();
foreach (string role in allRoles)
{
CheckBoxList1.Items.Add(role);
}
}
}

The GetAllUsers() method of Membership object returns a list of all the users in the form of a collection called MembershipUserCollection. Each element in this collection is of type MembershipUser. We iterate through the collection and add the UserName of each user to the ListBox.

On the same lines the GetAllRoles() method of Roles object returns a list of all roles in the form of string array. We iterate through this array and add all the roles to the CheckBoxList.

Once a user s selected in the ListBox his current roles need to be selected in the CheckBoxList. This is done by handling SelectedIndexChanged event of the ListBox as shown below:

protected void ListBox1_SelectedIndexChanged
(object sender, EventArgs e)
{
string[] userRoles = Roles.GetRolesForUser
(ListBox1.SelectedValue);
foreach (string role in userRoles)
{
ListItem li = CheckBoxList1.Items.FindByValue(role);
if (li != null)
{
li.Selected = true;
}
}
}

We used GetRolesForUser() method of Roles object and pass the selected user from the ListBox. The method returns all the roles that the user belongs to in the form of a string array. We then iterate through the array and mark the corresponding item from the CheckBoxList as selected.

Finally, when the administrator adds or removes the user to one or more roles the changes need to be saved. This is done by handling Click event of the "Assign Roles" button as shown below:

protected void Button1_Click(object sender,
EventArgs e)
{
foreach (ListItem li in CheckBoxList1.Items)
{
if (li.Selected == true)
{
if (Roles.IsUserInRole(ListBox1.SelectedValue,
li.Value) == false)
{
Roles.AddUserToRole(ListBox1.SelectedValue, li.Value);
}
}
else
{
if (Roles.IsUserInRole(ListBox1.SelectedValue,
li.Value))
{
Roles.RemoveUserFromRole(ListBox1.SelectedValue,
li.Value);
}
}
}
}

We iterate through the CheckBoxList to check which roles are to be assigned to the user. The user is added to a role using AddUserToRole() method of the Roles object. Similarly, a user is removed from a role by using RemoveUserFromRole() method of the Roles object. Note that trying to add a user to a role to which he already belongs to will result in an exception and hence we used IsUserInRole() check.

Using Login control

Now that we have developed the role management page we will move further to develop the Login page. Recollect that we developed Login.aspx in Part 1 but it provides just registration facility. We will modify the same web form to include login functionality also.

Open the web form in VS.NET and drag and drop a Login control on it. The Login control has many properties that allow you to customize its appearance and behavior. We will use only few of them in our example. Set DisplayRememberMe property to false. This property governs whether to display "Remember Me" checkbox or no. Also, set DestinationPageUrl property to "Default.aspx". This property controls the web form that is displayed to the user upon successful login.

Figure 2 shows the Login.aspx after incorporating Login control. Note that the Login control internally takes care to validate the user against the database and issue a FormsAuthentication cookie. If you wish you can do the same thing yourself by creating a custom login user interface and then using Membership.ValidateUser() and FormsAuthentication.SetAuthCookie() methods.

Figure 2

Using LoginName, LoginStatus and LoginView controls

Once the user is logged in we take him to Default.aspx. We want to develop Default.aspx as shown in Figure 3.

Figure 3

We display a welcome message for the user followed by Logout LinkButton. Depending on the role of the user we display a Label mentioning his role. Finally, we display the Profile information that we captured during registration.

In order to develop this page, open Default.aspx in VS.NET. Drag and drop a Label and set its Text property to Welcome. Drag and drop a LoginName control beside it. The LoginName control automatically display the User ID of the current user. You can do the same think yourself using User.Identity.Name property. Also, drag and drop a LoginStatus control beside the LoginName control that you just put. The LoginStatus control displays the current state (Logged in or Logged out) of the user and allows the user to Login or Log out depending on the current status. You can achieve this yourself by using a LinkButton and calling FormsAuthentication.SignOut() method in its Click event.

Now comes the interesting part. As per our functionality we need to display a Label (or any piece of UI in general) specific to the role of the user. This is often called as Role Based Security. As you might have guessed there are two ways to accomplish our task. In the "do it yourself" way you can use Roles.IsUserInRole() method to check the role of the user and then set the Label accordingly. However, the LoginView control makes your life easy. It is declarative way to hide/show certain part of the UI to the user depending on their role.

In order to use the LoginView control, drag and drop it on the web form. From the smart tag select "Edit RoleGroups..." (Figure 4).

Figure 4

This will open "RoleGroup Collection Editor" as shown in Figure 5.

Figure 5

Using this editor you can add one or more Role Groups. A role group is a set of roles that can have a UI template in the LoginView control. In our example we created three role groups of each role in the system but you can have multiple roles per group also.

Once you add the role groups you will notice various "Views" in the smart tag (Figure 6). Each view is nothing but a UI template which is displayed if the user belongs to the role group.

Figure 6

Select each view and drag and drop a Label in it. Set the Text property of the Label to indicate the role name.

The control also has anononymous and LoggedIn templates which are meant for displaying UI for anonymous and authenticated users (no role checking).

Finally, add the following code in the Page_Load event handler.

protected void Page_Load(object sender, EventArgs e)
{
Label10.Text = Profile.FullName;
Label11.Text = Profile.DOB.ToShortDateString();
Label12.Text = Profile.Salary.ToString();
Label13.Text = Profile.Address.Street + ",\r\n" +
Profile.Address.State + ",\r\n" +
Profile.Address.Country + " - " +
Profile.Address.PinCode;
}

Here, we simply show the Profile property values in Labels. Note that these details were captured during registration process.

That's it! You are now ready to test the application complete with registration, profile, authentication and role based security.

Note : this article is collected from the website all right reserved BinaryIntellect Consulting.

Membership, Roles and Profile -Part 1

Introduction

The new membership, roles and profile features introduced in ASP.NET 2.0 significantly reduce development time that is otherwise spent in traditional approaches. Securing your web site by implementing a flexile membership scheme backed with role based security is required in many professional web sites. In this article series we are going to see these features in action with the help of an example.

Example Scenario

Let's assume that we want to develop a security and membership scheme for a professional web site. We want to capture the following details about the user:

  • UserID
  • Password
  • Email
  • Security Question
  • Security Answer
  • Full Name
  • Birth Date
  • Yearly Salary
  • Address

The web site has three roles - NormalUsers, PowerUsers and Administrators. When a user registers with the web site by default he is assigned to NormalUsers role. Later on the administrator may add him to any other role. Whenever anybody tries to access the web site, the user should be asked for User ID and password. Upon supplying a correct User ID and Password the user should be taken to the main page of the web site. Depending upon the role of the user the content of the main page is rendered.

Steps required

In order to meet our requirement we will use ASP.NET 2.0 Membership, Roles and Profile features. The overall steps required in fulfilling our requirements are as follows:

  • Configure a SQL Server database to store membership, roles and profile data
  • Configure Membership, Roles and Profile providers for the web site
  • Create roles in the system
  • Create a registration page that will capture above details from the user
  • Create a login page
  • Create the main page with content

Configure a SQL Server database

In order to store Membership, Roles and Profile data in a SQL Server database we must configure it using aspnet_regsql.exe command line tool. The tool starts a wizard that guides you through the steps. The tool creates certain tables and stored procedures in the database that are used by these features. Figure 1 and Figure 2 shows the main steps of this tool.

Figure 1

Figure 2

The step indicated by Figure 1 allows us to configure the database for membership, roles and profile services. The same step can be used if at all we decide to remove the services for some reason. The step indicated by Figure 2 allows us to specify the database that is to be configured.

Though not mandetory it would be interesting to know the tables used by these features. The following table lists the tables used by membership, roles and profile features respectively.

Feature Tables Used
Membership aspnet_users
aspnet_membership
Roles aspnet_roles
aspnet_usersinroles
Profile aspnet_profile

Configure Membership, Roles and Profile providers for the web site

once you configure the database the next step is to configure membership, roles and profile providers for your web site. In order to do so open the web.config file and add the following markup in it:


type="System.Web.Security.SqlMembershipProvider"/>


type="System.Web.Security.SqlRoleProvider"/>


type="System.Web.Profile.SqlProfileProvider"/>


The markup consists of various sections.

  • The section configures our web site to use Forms based authentication
  • The section denies access to anonymous users
  • The section stored the connection string to the Northwind database. This connection string is used by other tags such as and
  • The tag configure the membership provider used by our web site. Through this tag ASP.NET knows about the data store used by our web site for membership data
  • The tag configure the role provider used by our web site. Through this tag ASP.NET knows about the data store used by our web site for roles related data
  • The tag configure the profile provider used by our web site. Through this tag ASP.NET knows about the data store used by our web site for profile data. The sub section of this tag specifies the profile properties and groups. Observe how the data type of certain properties is mentioned via type attribute. Note that the user information is captured partly by the membership features (User ID, Password, Email, Security Question, Security Answer) and partly by Profile features (Full Name, Birth Date, Salary, Address)

Creating roles

In order to create roles needed by our application, we will use Web Site Administration Tool accessible via WebSite > ASP.NET Configuration menu option.

Figure 3 shows the Security tab of this tool.

Figure 3

As you can see the Roles section allows you to create or manager roles of the web site. Figure 4 shows the roles created using this tool.

Figure 4

Creating a user registration page

Traditionally developers used to create a user registration page by assembling various controls such as TextBoxes, DropDownLists and Buttons. Fortunately ASP.NET 2.0 comes with a control called CreateUserWizard that simplifies the job. This control not only provides readymade registration functionality but also allows you to customize it. In our example the first five pieces about a user i.e. User ID, Password, Email, Security Question and Security Answer are collected by the control out of the box. In order to collect the remaining pieces we need to customize the control by adding our own "Wizard Step".

Proceed by adding a new web form called Login.aspx. Drag and drop a CreateUserWizard control on it. From the smart tags select "Add/Remove wizard steps" to open a dialog as shown in Figure 5.

Figure 5

Add a new "Templated Wizard Step" using Add button and set its Title property to "User Profile" and StepType property to Step. Now design the step as shown in Figure 6.

Figure 6

The template consists of TextBoxes and RequiredFieldValidator controls for accepting extended user information (profile). After you finish designing the template add the following code in NextButtonClick event handler of the CreateUserWizard control. This event is raised when the user click on any Next button.

protected void CreateUserWizard1_NextButtonClick
(object sender, WizardNavigationEventArgs e)
{
if (e.CurrentStepIndex==1)
{
TextBox t;

t = (TextBox)CreateUserWizard1.ActiveStep.
Controls[0].FindControl("TextBox1");
Profile.FullName = t.Text;

t = (TextBox)CreateUserWizard1.ActiveStep.
Controls[0].FindControl("TextBox2");
Profile.DOB = DateTime.Parse(t.Text);

t = (TextBox)CreateUserWizard1.ActiveStep.
Controls[0].FindControl("TextBox3");
Profile.Salary = double.Parse(t.Text);

t = (TextBox)CreateUserWizard1.ActiveStep.
Controls[0].FindControl("TextBox4");
Profile.Address.Street = t.Text;

t = (TextBox)CreateUserWizard1.ActiveStep.
Controls[0].FindControl("TextBox5");
Profile.Address.Country = t.Text;

t = (TextBox)CreateUserWizard1.ActiveStep.
Controls[0].FindControl("TextBox6");
Profile.Address.State = t.Text;

t = (TextBox)CreateUserWizard1.ActiveStep.
Controls[0].FindControl("TextBox7");
Profile.Address.PinCode = t.Text;
}

}

Here, we check the index of the current step via CurrentStepIndex property of WizardNavigationEventArgs class. Inside the if condition we get reference to each TextBox with the help of FindControl() method. The value entered in the textBox is then assigned to the corresponding profile property. Note that the profile properties that you specified in the web.config file appear as properties of the Profile object.

We want that initially all the users be part of NormalUsers role. This is done by handling CreatedUser event of the CreateUserWizard control.

protected void CreateUserWizard1_CreatedUser
(object sender, EventArgs e)
{
Roles.AddUserToRole(CreateUserWizard1.UserName
, "NormalUsers");
}

Here, we used AddUserToRole() method of the Roles object to add the current user to NormalUsers role. The user name is retrieved via UserName property of CreateUserWizard control.

Finally, set the ContinueDestinationPageUrl property of CreateUserWizard control to Default.aspx.

That's it! You can now run the Login.aspx and create new users in the system using the CreateUserWizard control.

In the next part we will see:

  • How administrator can assign users to one or more roles.
  • How users can login to the web site.
  • How to develop Default.aspx that shows content for different roles.

Till then stay tuned!

Note : this article is collected from the website all right reserved BinaryIntellect Consulting.

Sunday, December 28, 2008

RoleGroups property

RoleGroups property
-------------------------------------------------------------------------------------------------

The RoleGroups property contains the content templates associated with various roles on the Web site. The collection in the RoleGroups property is searched in the order in which templates are defined in the source. The first matching role-group template is displayed to the user. If a user is a member of more than one role, the first role-group template that matches any of the user's roles is used. If more than one template is associated with a single role, only the first defined template will be used.

If a logged-in user does not belong to any role contained in the role-group collection, the site displays the content template specified in the LoggedInTemplate property. Anonymous users are never shown any template contained in the RoleGroups collection.

Download source Code Click the Download Button


asp:LoginView ID="LoginView1" runat="server"
RoleGroups
asp:RoleGroup Roles="admin"
ContentTemplate
Add a new article.br
Review editorial changes.br
View article requests.br
your a logged in here as a Adminbr
ContentTemplate
asp:RoleGroup
asp:RoleGroup Roles="superuser"
ContentTemplate
Add a new article.
Review editorial changes.
View article requests.
your a logged in here as a Superuser.

ContentTemplate
asp:RoleGroup
RoleGroups
LoggedInTemplate
You Are Logged in here as a normal user
LoggedInTemplate
AnonymousTemplate
asp:Login ID="Login1" runat="server" BackColor="#F7F6F3" BorderColor="#E6E2D8"
BorderPadding="4" BorderStyle="Solid" BorderWidth="1px" Font-Names="Verdana"
Font-Size="0.8em" ForeColor="#333333"
TextBoxStyle Font-Size="0.8em"
LoginButtonStyle BackColor="#FFFBFF" BorderColor="#CCCCCC" BorderStyle="Solid"
BorderWidth="1px" Font-Names="Verdana" Font-Size="0.8em" ForeColor="#284775"
InstructionTextStyle Font-Italic="True" ForeColor="Black"
TitleTextStyle BackColor="#5D7B9D" Font-Bold="True" Font-Size="0.9em"
ForeColor="White"
asp:Login
AnonymousTemplate
asp:LoginView


Note : if you need Example code. mail me at rezakawser@yahoo.com

Sunday, November 9, 2008

Passing parameters from one ASP.NET(.aspx) page to another

Passing parameters from one page to another is a very common task in Web development. Granted, its importance and frequency has faded a bit with ASP.NET's inherent preference for postback forms, but regardless, there are still many situations in which you need to pass data from one Web page to another. There are three widely used methods of passing values from one page to another in ASP.NET


1. Using Query String
We usually pass value through query string of the page and then this value is pulled from Request object in another page.


FirstForm.aspx.cs

Response.Redirect("SecondForm.aspx?Parameter=" + TextBox1.Text);


SecondForm.aspx.cs

TextBox1.Text = Request. QueryString["Parameter"].ToString();

This is the most reliable way when you are passing integer kind of value or other short parameters.

More advance in this method if you are using any special characters in the value while passing it through query string, you must encode the value before passing it to next page. So our code snippet of will be something like this:


FirstForm.aspx.cs

Response.Redirect("SecondForm.aspx?Parameter=" + Server.UrlEncode(TextBox1.Text));


SecondForm.aspx.cs

TextBox1.Text = Server.UrlDecode(Request.QueryString["Parameter"].ToString());

2. Passing value through context object
Passing value through context object is another widely used method.


FirstForm.aspx.cs

TextBox1.Text = this.Context.Items["Parameter"].ToString();

SecondForm.aspx.cs

this.Context.Items["Parameter"] = TextBox1.Text;
Server.Transfer("SecondForm.aspx", true);

Note that we are navigating to another page using Server.Transfer instead of Response.Redirect.

Some of us also use Session object to pass values. In that method, value is store in Session object and then later pulled out from Session object in Second page.


3. Posting form to another page instead of PostBack
Third method of passing value by posting page to another form. Here is the example of that:


FirstForm.aspx.cs

private void Page_Load(object sender, System.EventArgs e)
{
buttonSubmit.Attributes.Add("onclick", "return PostPage();");
}

And we create a javascript function to post the form.

SecondForm.aspx.cs

function PostPage()
{
document.Form1.action = "SecondForm.aspx";
document.Form1.method = "POST";
document.Form1.submit();
}
TextBox1.Text = Request.Form["TextBox1"].ToString();


Here we are posting the form to another page instead of itself. You might get viewstate invalid or error in second page using this method. To handle this error is to put EnableViewStateMac=false

4. Another method is by adding PostBackURL property of control for cross page post back

In ASP.NET 2.0, Microsoft has solved this problem by adding PostBackURL property of control for cross page post back. Implementation is a matter of setting one property of control and you are done.


FirstForm.aspx.cs


SecondForm.aspx.cs

TextBox1.Text = Request.Form["TextBox1"].ToString();


In above example, we are assigning PostBackUrl property of the button we can determine the page to which it will post instead of itself. In next page, we can access all controls of the previous page using Request object.

You can also use PreviousPage class to access controls of previous page instead of using classic Request object.


SecondForm.aspx

TextBox textBoxTemp = (TextBox) PreviousPage.FindControl("TextBox1");
TextBox1.Text = textBoxTemp.Text;


As you have noticed, this is also a simple and clean implementation of passing value between pages.


Passing values between pages is another common task accomplishes in web based development. As we have discussed many of mechanisms above, I prefer and recommend to use Query String then other methods for its clean and simple implementation as long as your parameter doesnt have security concern.