Wednesday, April 1, 2009

Configuration SQL Server for remote connection

Configuration SQL Server for remote connection

------------------------------------------------------------------------------------------------


When you try to connect to an instance of SQL Server 2005 form a remote machine, you may receive the following error message.

"An error has occurred while establishing a connection to the server. When connecting to SQL Server 2005, this failure may be caused by the fact that under the default settings SQL Server does not allow remote connections."

Steps 1: Make sure that Remote Connections are enabled in Surface Area Configuration tool

Click Start -> Programs -> SQL server 2005 -> Configuration Tools - > SQL Server Surface Area Configuration

Now you will be able to see the following window


Now choose the first option there "Surface area Configuration for services and Connections"


Make sure that you choose the Right "SQL server instance at the Left Pane". As you can see from the above picture


.Select Database Engine->Remoteconnection->Using both TCP/IP and named pipes .like above picture .

Click on Apply button, you can see a warning message saying that you need to restart the Service.

STEP 2 : Check Whether TCP/IP protocol is enabled in the SQL Server Configuration Manager

Click Start -> Programs -> SQL server 2005 -> Configuration Tools - > SQL Server Configuration Manager


Now check whether "TCP/IP" is enabled, if not, double click on "TCP/IP" and choose "Yes" to enable it .


STEP 3: Make sure that SQL server Browser service is running


Click on the "SQL Server 2005 Services", on the left pane, and check "SQL server Browser" i running ? if not right click on that service and start. Or else choose properties and make the service to be run as "Automatic"


Now you are permitted to start "SQL server Browser"

start your service shown in figure .


Thnx All.

Tuesday, March 31, 2009

Create Manual New Role in ASP.NET

Create Manual New Role in ASP.NET
---------------------------------------------------------------------------------------------------
Design a login control using lebel,texbox and botton.


then write code in button Event


Roles.CreateRole(txt_addrole.Text);

Create Manual NewUser in ASP.NET

Create Manual NewUser in ASP.NET
---------------------------------------------------------------------------------------------------
Design a login control using lebel,texbox and botton.

then write code in button Event


MembershipCreateStatus membershipCreateStatus;
string providerIdKeyString = string.Empty;

MembershipUser newuser = Membership.CreateUser(txt_username.Text, txt_repassword.Text, txt_reemail.Text, dpd_question.Text, txt_answer.Text, true, out membershipCreateStatus);

switch (membershipCreateStatus)
{
case MembershipCreateStatus.Success:

ErrorStatus.Text = "The user account was successfully created!";
Roles.AddUserToRole(txt_username.Text, "reguser");
break;
case MembershipCreateStatus.DuplicateUserName:
ErrorStatus.Text = "That username already exists.";
break;
case MembershipCreateStatus.DuplicateEmail:
ErrorStatus.Text = "A user with that Email address already exists.";
break;
case MembershipCreateStatus.InvalidEmail:
ErrorStatus.Text = "PLease enter a VALID email address.";
break;
case MembershipCreateStatus.InvalidAnswer:
ErrorStatus.Text = "The security answer is not valid";
break;
case MembershipCreateStatus.InvalidPassword:
ErrorStatus.Text = "The password entered is invalid. PLease enter a passoword with at least 7 cahacters and one non-alphanumeric.";
break;
default:
ErrorStatus.Text = "Unknown Error: Account NOT created.";
break;

}

Create Manual Login in ASP.NET

Create Manual Login in ASP.NET
--------------------------------------------------------------------------------------------------

Design a login control using lebel,texbox and botton.


then write code in button Event


if(Membership.ValidateUser(txtUserName.Text.ToString(), txtPassword.Text.ToString()))
{
FormsAuthentication.SetAuthCookie(txtUserName.Text, remember.Checked );
Response.Redirect("~/Default.aspx");

}
else{
ErrorMgs.Text = "Invalid User Id or password";
}

Saturday, January 31, 2009

How to add a Login, Roles and Profile system to an ASP.NET 2.0 app in only 24 lines of code

How to add a Login, Roles and Profile system to an ASP.NET 2.0 app in only 24 lines of code

---------------------------------------------------------------------------------------

I’ve seen a few questions in the forums lately looking for examples on how to use the CreateUserWizard control to create new users in the ASP.NET 2.0 membership system, and then as part of the registration process assign the new user into custom roles and/or collect and store custom profile properties about them (country, address, gender, zipcode, etc).

Stefan from my team had a cool CreateUserWizard control sample that I borrowed and expanded upon to build-up a sample that demonstrates how to build a fairly common user management, roles and personalization system in ASP.NET 2.0 that does this. I was pleasantly surprised to find it only took about 25 lines of C# code in the entire app. J

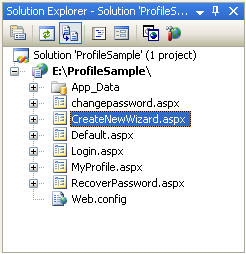
The sample comes with 6 pages:

Specifically it supports:

1) Login support to enable registered users to login to the web app using forms auth and the new membership system (login.aspx)

2) Registration support to enable visitors to create and register new users in the membership system (CreateNewWizard.aspx)

3) Profile support that enables the site to gather information about the user on registration, and for the users to see that information on a profile page (MyProfile.aspx).

4) Change Password support to enable registered users to change their password in the membership system (ChangePassword.aspx)

5) Password Recovery support to enable users to reset their password if they forgot them (RecoverPassword.aspx)

You can download and run the sample yourself from here. Note that it is built with the final release of VS 2005 and ASP.NET 2.0 – so it won’t work with Beta2 (although it will probably work with the RC).

Implementation Notes on CreateNewWizard.aspx and MyProfile.aspx:

Only two of the above pages (CreateNewWizard.aspx and MyProfile.aspx) have code in them. The others use the built-in Login controls in V2 to-do everything (asp:login, asp:passwordrecovery, asp:changepassword).

CreateNewWizard.aspx is the most interesting page. It uses the built-in server control to-do most of the heavy lifting and has two templated wizard steps defined within the wizard:

wizard step 1: gathering user-account data

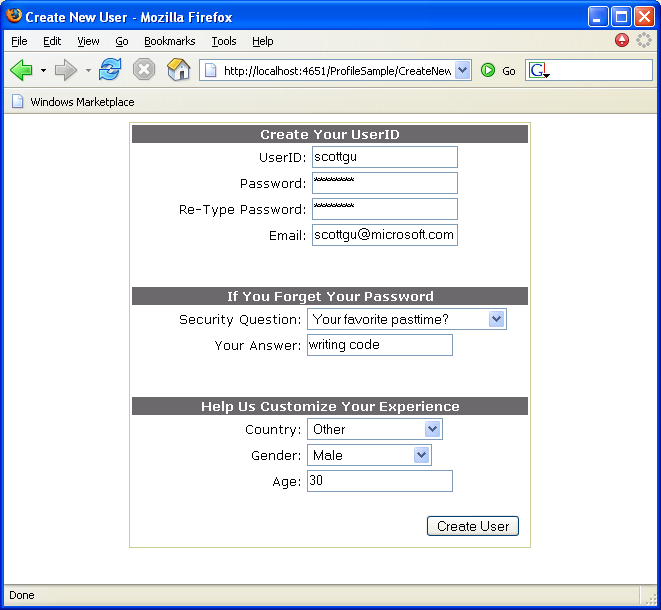
The control handles gathering up the user-account, email, password, and password recovery/answer data and then calling into the ASP.NET 2.0 membership system to register the new user. You simply have to override the control’s template and customize the control layout to have things look how you want.

The sample is using the ASP.NET validation controls to perform client-side validation on the inputs as well within the template (example: making sure passwords match, the age is a valid integer, etc). One added benefit in ASP.NET 2.0 is that these validation controls now support client-side validation for FireFox and other modern browsers (note: all screenshots were done using FireFox).

There are then three additional properties (their country, gender and age) that I wanted to gather up about the new user as part of the registration process. Doing this was pretty easy using the new ASP.NET 2.0 Profile system – simply add their definitions within the tag of the web.config file to register them and store their values in the new profile system:

<profile enabled="true">

<properties>

<add name="Country" type="string"/>

<add name="Gender" type="string"/>

<add name="Age" type="Int32"/>

properties>

profile>

I then handled the “CreatedUser” event on the CreateUserWizard control within my CreateNewWizard.aspx.cs code-behind file to retrieve the values from the controls within the CreateUserWizard control template and set them in the profile store:

// CreatedUser event is called when a new user is successfully created

public void CreateUserWizard1_CreatedUser(object sender, EventArgs e) {

// Create an empty Profile for the newly created user

ProfileCommon p = (ProfileCommon) ProfileCommon.Create(CreateUserWizard1.UserName, true);

// Populate some Profile properties off of the create user wizard

p.Country = ((DropDownList)CreateUserWizard1.CreateUserStep.ContentTemplateContainer.FindControl("Country")).SelectedValue;

p.Gender = ((DropDownList)CreateUserWizard1.CreateUserStep.ContentTemplateContainer.FindControl("Gender")).SelectedValue;

p.Age = Int32.Parse(((TextBox)CreateUserWizard1.CreateUserStep.ContentTemplateContainer.FindControl("Age")).Text);

// Save profile - must be done since we explicitly created it

p.Save();

}

Because the user is being created as part of this step, I explicitly choose to create a new Profile object in code (note that I was passing in the CreatedUserWizard1.UserName property as the username – since the user isn’t logged into the system yet). I then accessed the controls within the template of the control, pulled out their values, and stuck them within the newly created profile. Calling p.save at the end registered this profile with the new username. (note: I’ll walk through how we use this profile data later in a page below).

wizard step 2: picking roles

After the user fills out the first step of registration information and clicks the next button, the user is created, the CreatedUser event fires, and we fill in the appropriate information about the user into the profile store.

The control then displays the second step template we’ve defined. This template lists all of the roles currently created in the ASP.NET Role Management system, and allows the user to select which roles they belong to:

Note that you’d typically never assign roles to an end-user this way (instead you’d add your own logic to somehow calculate which role they belong in), but I thought this scenario was cool nonetheless which is why it works like the sample above.

I think it is cool because of the way we populate and access these roles in the template of the . Basically, we have a template definition to the .aspx like this:

<asp:WizardStep runat="server" AllowReturn="False"

OnActivate="AssignUserToRoles_Activate"

OnDeactivate="AssignUserToRoles_Deactivate">

<table>

<tr>

<td>

Select one or more roles for the user:

td>

tr>

<tr>

<td>

<asp:ListBox ID="AvailableRoles" runat="server"

SelectionMode="Multiple" >

asp:ListBox>

td>

tr>

table>

asp:WizardStep>

It simply contains a control named “AvailableRoles”. When this wizard step is loaded (after the user hits the next button on the first step in the wizard), it will fire the “OnActivate” event. We can use this to databind the list of all roles in the system to the above listbox. When the user hits next again, the wizard will fire the “OnDeactivate” event. We can then use this to determine which roles were selected in the above listbox, and use them to update the role-manager system.

The code to-do both of these actions looks like this:

// Activate event fires when user hits "next" in the CreateUserWizard

public void AssignUserToRoles_Activate(object sender, EventArgs e) {

// Databind list of roles in the role manager system to listbox

AvailableRoles.DataSource = Roles.GetAllRoles(); ;

AvailableRoles.DataBind();

}

// Deactivate event fires when user hits "next" in the CreateUserWizard

public void AssignUserToRoles_Deactivate(object sender, EventArgs e) {

// Add user to all selected roles from the roles listbox

for (int i = 0; i <>

if (AvailableRoles.Items[i].Selected == true)

Roles.AddUserToRole(CreateUserWizard1.UserName, AvailableRoles.Items[i].Value);

}

}

That is all of the code for the CreateNewWizard.aspx.cs file – 17 lines total if you omit comments and whitespace (if my count is right).

Next Step: Displaying User Profile Data

The only other page in this scenario that required me to add code was the MyProfile.aspx page. This page looks like this:

The page itself was pretty simple to implement. I simply added a few asp:label controls on the page, as well a listbox for the roles. Populating these controls with the profile and role information involved added a Page_Load event with 7 lines of code like so:

protected void Page_Load(object sender, EventArgs e) {

Country.Text = Profile.Country;

Gender.Text = Profile.Gender;

Age.Text = Profile.Age.ToString();

RoleList.DataSource = Roles.GetRolesForUser(User.Identity.Name);

RoleList.DataBind();

}

Note that the profile object is strongly typed – which means profile properties will get statement completion and compilation checking in VS 2005 with it. I can also then query the role management system to retrieve an array of all the roles the current user belongs to and then databind this to the listbox control.

Since the MyProfile.aspx page requires a user to be logged in (otherwise retrieving profile information about them doesn’t make a lot of sense), I also added a based authorization control tag in my web.config file:

<location path="MyProfile.aspx">

<system.web>

<authorization>

<deny users="?"/>

<allow users="*"/>

authorization>

system.web>

location>

This is the same configuration I would have added in ASP.NET V1.1 – and basically tells the system to deny all users who aren’t logged in (the ? = anonymous), and then allow all users who are logged in (the * = all).

Those who aren’t logged in will get automatically re-directed to the login.aspx page. The control can be used there to allow users who have already registered to log-in without the developer having to write any custom code.

Summary

Hopefully this walks-through a fairly common real-world web app scenario and explains how it can be easily done in ASP.NET 2.0. The ASP.NET 2.0 Membership, Role and Profile system (especially when combined with the new login controls) pack a lot of productivity power.

What is really nice is that they are all built on the new ASP.NET 2.0 provider model. Our of the box ASP.NET ships built-in providers that provide Membership, Roles and Profile storage inside SQL Express, SQL Server and Active Directory stores (the later for Membership and Roles only). What is even better is that you can replace any of these implementations using a custom provider that you either buy or build yourself (see this blog post for more details on how to-do this). Replacing a provider in ASP.NET 2.0 simply involves changing a value in a web.config file – the above code sample will work regardless of what provider was plugged in (LDAP, Oracle, DB2, Custom SQL Table Schema, File-System, etc).


Note: Copyright of this article is Scott. programmer of Microsoft.

Creating Custom Membership and Role Providers

Introduction

In the Part 1 and Part 2 we learnt the concept and internal architecture of ASP.NET provider model. We know that the provider model is extensible and one can implement custom providers to suit his requirement. In this part we will develop two custom providers - one for membership and the other for roles.

Why develop a custom membership and role provider?

Well. There can be many reasons. Here are few:

  • You have custom data store (not SQL Server or Access) in which you want to store user data.
  • You are using some non-standard database for which there is no inbuilt membership or role providers.
  • You want to implement custom encryption mechanism for the data being saved and retrieved
  • You want to write database independent membership and role provider

One more reason that I have not listed in the above list is - You may want to use your own table schema instead of using inbuilt one. At first glance it may look odd but it can be a great way to save your work while migrating applications.

Requirements

Let's decide the requirements for building our custom membership and role providers.

  • We want to use our application database for storing membership and role information. That also means that we do not have a central database for storing membership details of multiple applications
  • We want to store membership details in a table called Users
  • We want to store available roles in the system in a table called Roles
  • We want to store user-role mapping in a table called UserRoles
  • For the sake of simplicity we will not include any encryption-decryption logic
  • User can register by supplying user name, password and email. No security question is required
  • We do not need features such as password reset and accounting locking

Database access

We will be using BinaryIntellect DatabaseHelper open source component for all our database access.

Creating the Web Site

To begin, create a new web site and add two classes called MyMembershipProvider and MyRoleProvider to App_Code folder. For the sake of simplicity we will be creating all the necessary classes in the web site itself. In a more real world situations you may create a separate class library project to contain these classes.

Configuring the web site to use our providers

Open the web.config file and add the following markup:


type="MyMembershipProvider"
connectionStringName="connstr"/>


type="MyRolesProvider"
connectionStringName="connstr"/>

Here, we instruct ASP.NET to use MyMembershipProvider class as membership provider and MyRolesProvider class as roles provider.

Creating custom membership provider

Recollect from Part 2 that custom membership providers need to inherit from System.Web.Security.MembershipProvider class. The MembershipProvider class in turn inherits from ProviderBase class. The MembershipProvider class contains several abstract methods that you must implement in your class.

If you are using VS.NET then your job is simple. Right click on the MembershipProvider class in the class definition line and choose "Implement Abstract Class". VS.NET will add dummy delimitations for all the required methods and properties from the MembershipProvider class. The following table lists all the properties and methods that you need to implement (methods are shown with parenthesis).

Property/Method Name Description
Initialize()* Receives the connection string name specified in the web.config file. You can use it to perform database operation in your class.
Name* Represents name of our custom provider
CreateUser()* Creates a user
UpdateUser()* Saves modified information about an existing user
DeleteUser()* Deletes a user
GetUser()* Gets a user as MembershipUser instance
GetAllUsers()* Gets all the users as MembershipUserCollection
ChangePassword()* Changes password of a user
GetPassword()* Retrieves password of a user. Used when implementing "Forgot Password" feature
ValidateUser()* Authenticates the user
EnablePasswordReset* Indicates whether the password can be reset by the user
EnablePasswordRetrieval* Indicates whether the password can be retrieved by teh user
RequiresQuestionAndAnswer* Indicates whether user should supply a security question and answer during registration
RequiresUniqueEmail* Indicates whether the email supplied during registration should be unique
ApplicationName Name of the web application. This name is used in case you are using a central database for storing membership data of multiple applications
MaxInvalidPasswordAttempts Indicates the number of times user can try to login to the system
MinRequiredNonAlphanumericCharacters Indicates minimum no. of non alpha numeric characters that the user must supply during registration and password change
MinRequiredPasswordLength Indicates the minimum length required for the password when user registers or changes the password
ChangePasswordQuestionAndAnswer() Allows to change user's security question and answer
FindUsersByEmail() Searches user database on the basis of email
FindUsersByName() Searches user database on the basis of user name
GetNumberOfUsersOnline() Returns total no. of uses that are signed in
GetUser() Returns MembershipUser instance representing a specific user
GetUserNameByEmail() Returns the user name on the basis of email
PasswordAttemptWindow Indicates the time span for multiple login attempts
PasswordFormat Indicates the format of password e.g.clear, hashed etc.
PasswordStrengthRegularExpression Indicates a regular expression to be used to check the strength of password
ResetPassword() Resets the password
UnlockUser() Unlocks the user account

In our example we will code the methods and properties marked with * above. The remaining members will simply throw a "Not implemented" exception.

The complete source code of our custom membership provider can be found in the download (MyMembershipProvider.cs). As an example CreateUser() method implementation is given below:

public override MembershipUser CreateUser
(string username, string password,
string email, string passwordQuestion,
string passwordAnswer, bool isApproved,
object providerUserKey,
out MembershipCreateStatus status)
{
MembershipUser user = new MembershipUser(Name,
username, providerUserKey, email, passwordQuestion,
null, isApproved, false, DateTime.Now, DateTime.Now,
DateTime.Now, DateTime.Now, DateTime.Now);
string sql = "INSERT INTO USERS(USERNAME,PASSWORD,
EMAIL,ISACTIVE) VALUES(@UID,@PWD,@EMAIL,@ISACTIVE)";
db.AddParameter("@UID", username);
db.AddParameter("@PWD", password);
db.AddParameter("@EMAIL", email);
db.AddParameter("@ISACTIVE",
(isApproved == true ? "Y" : "N"));
int i = db.ExecuteNonQuery(sql);
if (i > 0)
{
status = MembershipCreateStatus.Success;
return user;
}
else
{
status = MembershipCreateStatus.ProviderError;
return null;
}
}

Creating custom roles provider

Creating custom roles provider involves creating a class that inherits from RoleProvider class. The following table lists all the properties and methods that you need to implement (methods are shown with parenthesis).

Property/Method Name Description
Initialize()* Receives the connection string name specified in the web.config file. You can use it to perform database operation in your class.
Name* Represents name of our custom provider
CreateRole* Create a new role
DeleteRole* Deletes an existing role
GetAllRoles* Returns all roles as string array
RoleExists* Checks if role exists in the database
AddUsersToRoles* Adds users to specified roles
RemoveUsersFromRoles* Removes users from specified roles
GetRolesForUser* Returns all the roles for a specific user
GetUsersInRole* Returns all the users belonging to a specified role
IsUserInRole* Checks if a user exists in a specified role
ApplicationName Name of the web application. This name is used in case you are using a central database for storing membership data of multiple applications
FindUsersInRole Searches for users belonging to a specified role

In our example we will code the methods and properties marked with * above. The remaining members will simply throw a "Not implemented" exception.

The complete source code of our custom membership provider can be found in the download (MyRolesProvider.cs). As an example CreateRole() method is given below:

public override void CreateRole(string roleName)
{
db.AddParameter("@ROLE", roleName);
db.ExecuteNonQuery
("INSERT INTO ROLES(ROLENAME) VALUES(@ROLE)");
}

Testing our providers

There are four test web forms provided along with the download - Default.aspx, Login.aspx, RoleManager.aspx and UserRoles.aspx. The first two test the membership provider and the later two test the roles provider. We use essentially the same Membership and Roles classes of ASP.NET. These classes in turn call our custom provides to get the job done.

Summary

In this article we saw how easy it is to develop your own providers for membership and role management. You can extend the application to suit your needs. You can also add more security features such as encryption and password strength.


Note : this article is collected from the website all right reserved BinaryIntellect Consulting.

Implementing Role Based Security in ASP.NET

Introduction

ASP.NET allows three main ways to authenticating the user of the application. They are - Windows Authentication, Forms Based Authentication and Passport Authentication. Out of these three Windows and Forms authentications are most commonly used for intranet and internet applications respectively. Authentication involves validating that the user is what he claims to be. In many applications this is not just enough. You also need to grant access rights to the user based on his category. This process is referred to as authorization. The category I just mentioned is nothing but the role of the user. In this article we will see how to use Windows as well as Custom roles to authorize users of your application.

What are Principals, Roles and Identities?

Identities
Identities are nothing but the users of your application and allow you to obtain information about that user. The classes (GenericIdentity and WindowsIdentity) and interfaces (IIdentity) required for working with Identities reside in the System.Security.Principal Namespace.
Roles
A role is nothing but a set of access rights that is assigned to the user. One user may have one or more roles. You must be familiar with Windows roles such as Administrator and Guest.
Principals
A Principal is combination of the identity and role(s) of the user. The classes and interfaces related to Principals (GenericPrincipal, WindowsPrincipal and IPrincipal) can be found in System.Security.Principal Namespace.

When to authorize a user?

Note that you should authorize a user only after authenticating. The Request.IsAuthenticated property tells you whether the user is authenticated or not. You should check this in Application_AuthenticateRequest event handler in Global.asax. This event is fired for each request at the time of authenticating the user. If the user is already authenticated by windows or forms authentications then you follow above steps

Authentication in ASP.NET

ASP.NET provides three ways to authenticate your users. They are:
  • Windows
  • Forms
  • Passport
Out of these three the first two are commonly used in ASP.NET applications.

Role based security and Windows Authentication

When you use Windows authentication to authenticate a user, you also have roles for that user based on its Windows group. For example, a user User1 might belong to group Administrators and the same role can be used in ASP.NET applications. You can check whether a user belongs to a particular role or not you need to write something like this:
if(User.IsInRole("BUILTIN\Administrators")
{
//display all options
}
else
{
//display limited options
}
Here, the IsInRole() method is used to check whether a given user has a given role. Note how we used BUILTIN for local users. If you are authenticating domain users you may write something like MYDOMAIN\Administrators. Also, note that here we didn't created any identity or principal object ourselves. Windows and ASP.NET automatically did that for us.

Role based security and Forms authentication

If you are authenticating users via Forms authentication then you need to take care of some extra steps. These steps are:
  • Create a user identity
  • Create an array of roles
  • Create a principal based on user identity and list of roles
  • Attach the principal to the current authenticated user

Create a user identity

User identity is represented by a class that implements IIdentity interface. .NET comes with a class GenericIdentity that is a simple implementation of IIdentity interface. Here, we will create a user identity using GenericIdentity class.
GenericIdentity gi=new GenericIdentity(User.Identity)
Here, we used the same identity object as created by forms authentication (User.Identity) but you can use your own ideality instead.

Create an array of roles

Next, we need to create an string array containing roles to which the user belongs.
string[] roles={"clerk","manager"};

Create a principal based on user identity and list of roles

We will now create a principal based on the identity and role information that we have. .NET provides a class called GenericPrincipal that represents a simple implementation of IPrincipal.
GenericPrincipal gp=new GenericPrincipal(gi,roles);

Attach the principal to the current authenticated user

Finally, we need to attach the principal we just created to the ASP.NET application. The way you do this is as follows:
Context.User = gp;
Here, Context.User represents the current principal of the application. You are replacing it with your own principal (gp). Note that code for all above steps will typically go in Application_AuthenticateRequest event handler inside Global.asax.

Authorizing the user

Once you have done this, authorizing a user is same as in Windows authentication.
if(User.IsInRole("manager")
{
//display all options
}
else
{
//display limited options
}

Summary

In this article we saw how to add role based security to your ASP.NET applications. using IIdentity and Iprincipal interfaces you can create your custom implementation or you can use GEnericIdentity and GenericPrincipal classes. Once you set a custom principal to the user you can use user.IsInRole() method to check whether user belongs to the specified role or not.